
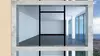
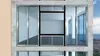
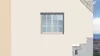
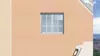
Saint-Gobain Façade Infill System Single Stud Frame - Direct Render
Our façade systems have low carbon footprint solution compared to traditional construction and offer many benefits. They are energy efficient, provide good comfort, are available locally and contribute to many building labelling schemes.
Façade systems using structural steel framing, sometimes referred to as SFS or LGS are light, and reduce the load on the building and of course significantly increase the speed of construction compared to traditional building methods.
Key facts
- Reduced risk of moisture development due to dry construction.
- The system offers high thermal & acoustic comfort: Rw up to 70 dB.
- The material used have low VOC content ensuring good levels of indoor air quality.
- 75% less deliveries on site as compared to traditional methods.
- Less wastage.
- Material handling.
Documents

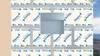
Gypframe® X channels are fixed in either a single or twin frame construction to the floor and soffit using Gyproc Wedge Anchors fixed at stud locations.

Gypframe® X studs are then fixed into the Gypframe® X channels using two Gyproc Tech Screws, one through each flange.

Insulate the cavity using KIMMCO-ISOVER (glass or stone mineral wool) for improved acoustic, thermal and fire performance.

Glasroc X boards are lightly butted together and fixed to the framing externally using, Glasroc X Screws for wind loads up to 3kPa or Gyproc HP Façade Screws for wind loads above 3kPa, at 150mm centres around the perimeter and intermediate studs.

Option A: Apply webertherm base into the board joints with 150mm of webertherm mesh and cover with a second layer of webertherm base to fill the tapered joint.

Option B: Apply only Glasroc X Sealing Tape White into the board joints.

Apply first layer of webertherm base at 2-3mm thickness uniformly across the Glasroc X boards using an appropriate trowel to control the thickness, embedded with webertherm mesh.

Only after the first layer of webertherm base has completely dried, apply a second layer of webertherm base at 2-3mm thickness uniformly over first layer with mesh. Total thickness should be approximately 6mm thick

Apply weberpas PR 300 in a matching colour to the proposed finish in two coats. Allow the first layer to dry completely before application of the second layer. The first coat should be applied horizontally and the second vertically, or vice versa.

Once the primer layers are completely dry, apply weberpas deco 350 textured coating over entire surface.
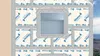
Gypframe® X channels are fixed in either a single or twin frame construction to the floor and soffit using Gyproc Wedge Anchors fixed at stud locations.
Gypframe® X studs are then fixed into the Gypframe® X channels using two Gyproc Tech Screws, one through each flange.
Insulate the cavity using KIMMCO-ISOVER (glass or stone mineral wool) for improved acoustic, thermal and fire performance.
Glasroc X boards are lightly butted together and fixed to the framing externally using, Glasroc X Screws for wind loads up to 3kPa or Gyproc HP Façade Screws for wind loads above 3kPa, at 150mm centres around the perimeter and intermediate studs.
Option A: Apply webertherm base into the board joints with 150mm of webertherm mesh and cover with a second layer of webertherm base to fill the tapered joint.
Option B: Apply only Glasroc X Sealing Tape White into the board joints.
Apply first layer of webertherm base at 2-3mm thickness uniformly across the Glasroc X boards using an appropriate trowel to control the thickness, embedded with webertherm mesh.
Only after the first layer of webertherm base has completely dried, apply a second layer of webertherm base at 2-3mm thickness uniformly over first layer with mesh. Total thickness should be approximately 6mm thick
Apply weberpas PR 300 in a matching colour to the proposed finish in two coats. Allow the first layer to dry completely before application of the second layer. The first coat should be applied horizontally and the second vertically, or vice versa.
Once the primer layers are completely dry, apply weberpas deco 350 textured coating over entire surface.