
Rigitone acoustic ceilings
Perforated acoustic solution with set or random design with borderless pattern and Activ'Air functionality
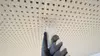
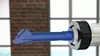
Rigitone boards are premium-quality perforated plasterboards with detailed design combining function and aesthetics: In addition to their wide range of perforation patterns, Rigitone Activ’Air boards also demonstrate optimum acoustic properties, particularly in the frequency range of the human voice.
This range enables the creation of seamless ceiling systems with harmonious and architecturally appealing ceiling patterns, and outstanding acoustic properties.
Key facts
- Sound absorbing solutions with high reverberation control
- Monolithic appearance with set or random patterns
- Sustainable & 100% recyclable
- Robust design
- Improves indoor air quality
- Simple accommodation of access panels
INSTALLATION OVERVIEW

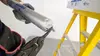
Install the Gypframe ceiling framework as described in the Gyproc mf ceiling section ensuring that Gypframe MF5’s are installed at approximately 330mm centres – see Table 1 for guidance. Set out the ceiling ensuring Rigitone boards are installed perpendicular to the MF5’s and the Rigitone patterns are aligned using the Rigitone Installation Kit to correctly space the boards.

Fix Rigitone boards using 25mm Gyproc Drywall Screws at a maximum of 170mm centres. Screw fix the board perimeter prior to fixing the field of the board.

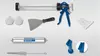
Rigitone® ReadyMix Set

Cut the end of Rigitone Mix 600ml tube.

Insert the Rigitone Mix 600ml tube in the Rigitone ReadyMix pistol.

Screw the Rigitone Fix joint nozzle onto the adapter. Screw the Rigitone Fix joint nozzle and attached adapter tightly onto the Rigitone ReadyMix pistol.

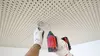
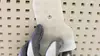
Screw heads are then filled with Gyproc Joint Compound using the Rigitone screw head template to help ensure no jointing compound enters into the perforations of the board.

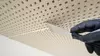
Once the Rigitone Mix between the boards has begun to harden, remove any excess carefully using the Rigitone scraper. Pass the scraper back over the joints in the other direction to smooth the surface.

The joints and covered screw heads can be sanded after 24 hours. Further finishing work may be continued once the Rigitone Mix has fully dried.
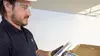
Install the Gypframe ceiling framework as described in the Gyproc mf ceiling section ensuring that Gypframe MF5’s are installed at approximately 330mm centres – see Table 1 for guidance. Set out the ceiling ensuring Rigitone boards are installed perpendicular to the MF5’s and the Rigitone patterns are aligned using the Rigitone Installation Kit to correctly space the boards.
Fix Rigitone boards using 25mm Gyproc Drywall Screws at a maximum of 170mm centres. Screw fix the board perimeter prior to fixing the field of the board.
Rigitone® ReadyMix Set
Cut the end of Rigitone Mix 600ml tube.
Insert the Rigitone Mix 600ml tube in the Rigitone ReadyMix pistol.
Screw the Rigitone Fix joint nozzle onto the adapter. Screw the Rigitone Fix joint nozzle and attached adapter tightly onto the Rigitone ReadyMix pistol.
Screw heads are then filled with Gyproc Joint Compound using the Rigitone screw head template to help ensure no jointing compound enters into the perforations of the board.
Once the Rigitone Mix between the boards has begun to harden, remove any excess carefully using the Rigitone scraper. Pass the scraper back over the joints in the other direction to smooth the surface.
The joints and covered screw heads can be sanded after 24 hours. Further finishing work may be continued once the Rigitone Mix has fully dried.